


How to create architectural drawings
Architectural drawings have a huge role in creating amazing buildings and structures. They are a visual representation of the architect’s ideas, allowing them to share their vision with clients, contractors, and builders. This article will look at the different elements of making architectural drawings and give helpful tips.
It’s important to know that architectural drawings are not just sketches or art. They are precise technical documents made using software like AutoCAD or Revit. These programs let architects make detailed plans, elevations, sections, and other vital parts for accurate construction.
When you start creating architectural drawings, make sure to get all relevant information about the project. This includes site measurements, client requirements, and local building codes. Having these details will help make sure the drawings follow regulations and meet the project’s needs.
Start by sketching rough outlines and basic floor plans on paper before moving to digital platforms. This way, you can check out different design possibilities without limits.
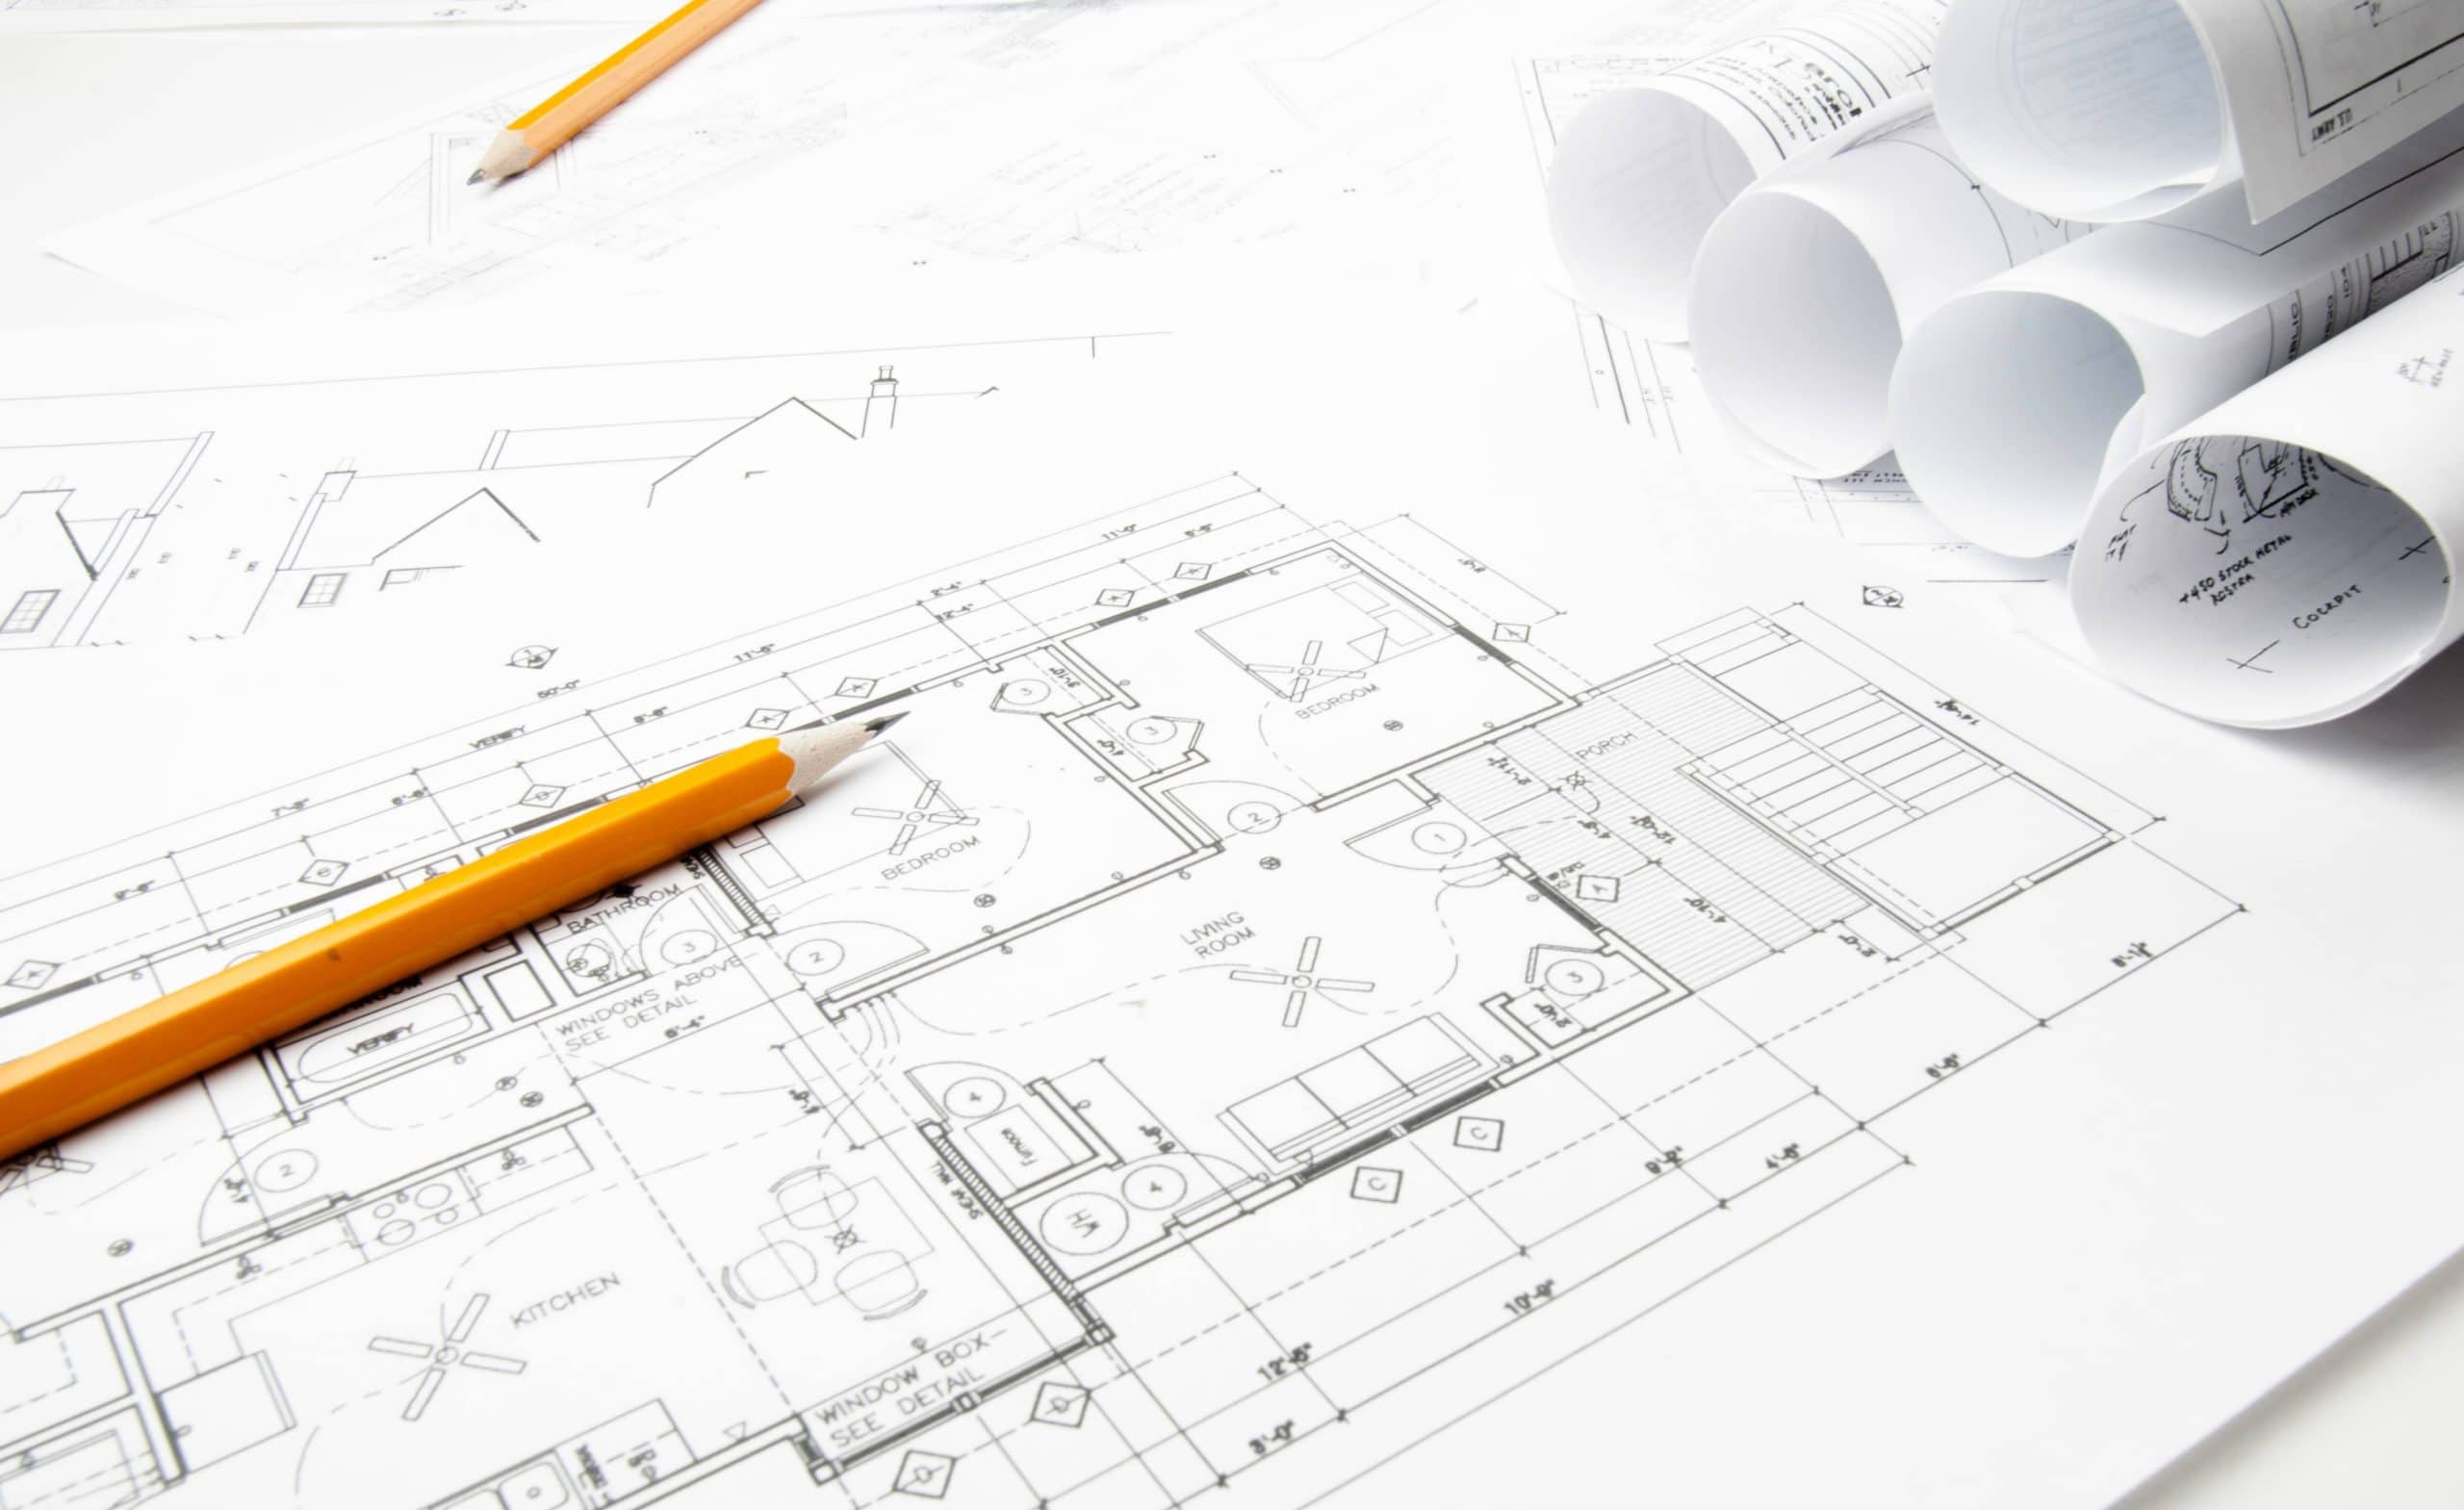
When making architectural drawings, focus on details. Measure and dimension everything accurately, giving clarity to clients and builders. Also, label different parts of the drawing to help others understand your design.
To make it easier to read, use different line weights or colors to separate elements in your drawing. This improves visual hierarchy.
Remember that practice is key when it comes to architectural drawings. The more you do it, the better you get at communicating your ideas with visuals. Feel free to try different techniques or take inspiration from other architectural works.
Importance of architectural drawings
Architectural drawings are essential for the construction industry. They act as blueprints, giving crucial info to architects, engineers, and contractors. Without them, bringing a design to life would be difficult and prone to mistakes.
- Accurate Communication: These drawings make sure all involved in a construction project are clear on the design intent, dimensions, and specs.
- Visualization: Clients and stakeholders can get an idea of the final structure before building it. This helps them understand the layout, spatial relationships, and aesthetics.
- Coordination: With these drawings, various disciplines like electrical, plumbing and structural engineering can work together to build the building.
- Cost Estimation: These plans help accurately estimate costs, with info about materials, quantities, labor, and construction techniques.
Plus, architectural drawings are legal documents for getting permits and approvals. They also serve as a record of the design process and can be used for renovations or expansions.
To get the most out of these benefits, architects and designers should create clear, concise drawings that accurately represent their vision. Everyone should understand them.
Don’t miss out on the power of architectural drawings! Investing time and effort into creating detailed plans can save you from costly mistakes. So, get your drafting tools or fire up your computer- it’s time to bring your vision to life!
Step 1: Gathering the necessary tools and materials
Gathering all the right tools and materials is a must for making architectural drawings. Here’s a guide on what you’ll need:
- Measurements: Measure the space or structure you’re designing. Use a tape measure and note down all dimensions.
- Drawing tools: Collect pencils, erasers, rulers, and compasses. These will help draw precise lines and shapes.
- Paper: Get strong, quality paper that can handle multiple revisions.
- Templates: If you plan on using typical architectural elements such as doors, windows, and furniture, use templates to save time and ensure consistency.
- Reference materials: Have books, magazines, or online resources that can give ideas or instructions on specific design elements.
- Technology: Make sure you have access to computer software or a tablet for digital drawing. This will help with workflow and making changes.
Remember to also factor in the location or client’s preferences. If sustainability is involved, research eco-friendly products.
Now that you’ve got your tools and materials, let me tell you a story. I once made a design that didn’t fit the space given because I hadn’t focused on measurements – a lesson in the importance of precision in architecture.
Gather your tools and materials – the first step to creating architectural drawings. Stay tuned for more tips to bring your designs to life!
Step 2: Understanding the project requirements and specifications
To create architectural drawings that fulfill the client’s requirements, understanding project specifications is key. It means gaining an understanding of what the client wants and what the project involves. Here are three steps to take:
- Gather info: Meet with the client to discuss their vision. Ask questions and collect any documents or references they have. Research building codes and zoning ordinances to be aware of.
- Conduct site visits: Visit the project’s location to get an understanding of its characteristics. Measure, assess existing structures, and look at sunlight exposure, wind direction, and accessibility. This info will help inform design decisions.
- Collaborate: Talk to contractors, engineers, and other professionals involved. Regular communication will identify potential issues early on, avoiding delays in the design process.
It’s vital to stay up-to-date on industry trends and advancements. This way, architects can deliver better results for their clients. As an example, a renowned architect once designed an open-concept layout without understanding the client’s lifestyle preferences. This story shows how important it is to understand clients’ needs before starting design work.
Step 3: Creating a rough sketch or concept design
For a successful architectural drawing, it’s essential to begin with a rough sketch or concept design. Here are the steps for creating one:
- Visualize your design ideas and the building’s layout and functionality.
- Grab paper and a pencil to draw out what you imagined.
- Make simple lines, shapes, and symbols to represent different elements.
- Experiment with arrangements and configurations until you’re pleased with it.
- Analyze it critically and make any desired changes.
- Use the rough sketch as a base to refine the details and add dimensions.
To get an even better design, consider these tips:
- Pay attention to size and relationships.
- Incorporate shading to add depth.
- Add sketches or annotations to highlight design features.
By following these steps and tips, you can create a great rough sketch or concept design for your architectural drawings. Keep in mind that this stage allows for creativity and flexibility.
Step 4: Develop a detailed floor plan
Developing a detailed floor plan is a must for creating architectural drawings. It involves designing and laying out each room and space in the building. This helps architects visualize the arrangement and purpose of the structure.
Start with measuring the walls, doors, and windows accurately. Use graph paper or software to make a scale drawing. Then, place sinks, toilets, or kitchen appliances where they should go.
Add walls and partitions to define rooms and spaces. Insert details such as electrical outlets, switches, and furniture.
Architects must consider traffic flow, accessibility, and aesthetics when developing these plans. They should also consult with clients or others to ensure that the floor plan matches their needs and desires.
A case in point is an architect working on a commercial project. Despite making architectural drawings, they forgot to measure the kitchen appliances. This caused delays and added expenses for both the architect and the client. It shows how vital it is for architects to make detailed floor plans.
Developing a detailed floor plan is a significant part of architectural design. By following these steps and seeking input from relevant people, architects can create spaces that satisfy everyone.
Step 5: Designing elevations and sections
- Identify key elements: List out walls, windows, doors, columns, and other features that are important for conveying the design.
- Determine scale: Based on the project size and detail required, decide the scale – and be consistent throughout all drawings.
- Outline sketches: Sketch the basic outlines of your building on paper or via CAD software.
- Add details: Include elements such as window panes, brickwork patterns, roof tiles, etc.
- Create cross-sections: Slice through the building at strategic locations using cutting planes or elevation markers.
- Label and annotate: Label each element with clear annotations or callouts. This helps viewers understand dimensions, materials used, and construction techniques.
Remember accuracy and precision when designing elevations and sections. Consider the context of the overall project and ensure the design aligns with the environment and style. Start implementing these techniques today!
Step 6: Adding details and annotations
Adding details and annotations is vital for architectural drawings. It involves giving precise info and explanatory notes to make the design easier to understand. This step makes sure all elements are accurately represented.
For Step 6:
- Identify important components. Doors, windows, fixtures, and structural elements must be represented clearly.
- Use accurate measurements. List length, width, height, angles, and curves.
- Provide explanatory notes. Explain the purpose, materials used, and other relevant info.
- Prioritize readability and organization. Use labels, symbols, and legends to avoid confusion.
Here are a few special points to remember when adding details and annotations:
- Visual clarity with consistent line weights.
- Different colors or hatches to differentiate materials or layers.
- Graphical symbols to convey complex info concisely.
By following these guidelines for details and annotations, you can make sure your design vision is executed correctly. Don’t miss out on the chance to make your drawings into guides for construction pros. Add the specifics and bring life to your drawings! Your attention to detail will make a big difference in the end result. Take action now!
Step 7: Creating supplementary drawings
Creating supplementary drawings is an important part of the architectural drawing process. Here’s a guide to help you make them effectively:
- Identify the purpose. Figure out what your supplementary drawing should show – like a detailed section or design elements.
- Choose the right views. Select ones that illustrate what you want to show. Different perspectives or isometric views can help.
- Add details. Include all relevant ones to support your purpose. This could be dimensions, annotations, labels, and symbols.
- Use the correct scale. This will help keep accuracy and make sure all elements are in proportion.
- Keep it consistent. Maintain style, line weights, and notations across all your architectural drawings. This will make them look good and easy to understand.
Also take into account legibility, precision, and architectural standards while creating supplementary drawings.
Did you know? Architectural drawings act as a common language for architects around the world (source: Architectural Digest).
Conclusion
Creating architectural drawings requires a sharp eye for detail and an excellent knowledge of design principles. With meticulous preparation and meticulous execution, architects can bring their visions to life on paper.
We have already looked at various tactics and advice for designing architectural drawings. We began by talking about the significance of correct measurements and scale for protecting the reliability of the design. We then looked into the use of different tools and software to make the drawing process simpler.
An exclusive part we haven’t discussed yet is the addition of sustainable elements into architectural drawings. As sustainability becomes more critical in design, architects are finding innovative ways to show eco-friendly features in their drawings. From green roofs to solar panels, these details not only enhance the look but also communicate a dedication to environmental responsibility.
Now, let’s jump into a captivating true story about architectural drawings. In the 15th century, Italian architect Filippo Brunelleschi revolutionized architectural representation with his perspective drawings. His exact portrayal of depth and proportion established the basis for modern architectural drafting techniques. Through his pioneering work, Brunelleschi changed architectural drawing from mere documentation to an art form itself.
Frequently Asked Questions
FAQs: How to Create Architectural Drawings
1. How can I start creating architectural drawings?
To begin creating architectural drawings, you should first gather all necessary information about the project requirements and understand the specific needs of the client. Then, create a rough sketch or concept map to plan the layout. Use computer-aided design (CAD) software to digitally create detailed drawings.
2. What are the essential elements of architectural drawings?
Architectural drawings typically include floor plans, elevations, sections, and construction details. Floor plans provide an overhead view of the building layout, elevations show vertical views of the structure, sections offer sliced views to reveal internal details, and construction details focus on specific components like windows or stairs.
3. Which tools and software are commonly used for creating architectural drawings?
Architects commonly use a range of tools and software for creating architectural drawings. These may include traditional drafting tools like pencils, rulers, and compasses, as well as computer software such as AutoCAD, SketchUp, Revit, or ArchiCAD.
4. What are some important considerations while creating architectural drawings?
When creating architectural drawings, it is crucial to accurately represent the scale and dimensions of the building, adhere to local building codes and regulations, consider the functionality and aesthetics of the design, and communicate effectively with both clients and construction professionals.
5. How can I improve my architectural drawing skills?
To enhance your architectural drawing skills, practice regularly by attempting different types of drawings, studying architectural styles and principles, seeking feedback and guidance from experienced architects or professionals, and exploring various drawing techniques and mediums.
6. Are there any industry standards or specific formats to follow for architectural drawings?
Yes, architectural drawings should typically follow industry standards to ensure clarity and compatibility. Common formats include scaled drawings, standardized symbols, and proper labeling of elements. It is also essential to adhere to regional or national drafting standards and guidelines when creating architectural drawings.
Subject: How to create architectural drawings
Company: Hollywood Connections Center
Network: MyHollywoodPage.com
The Hollywood network of arts and creative professionals.

