


How to set up a chroma key studio
Chroma key studios are essential for making remarkable visual effects in films and TV shows. The setup may look daunting, but with some simple steps, you can create stunning scenes.
- Firstly, pick a good spot for the Chroma Key studio. Look for a space with enough room and no background noise. Buy top-notch lights to get even lighting.
- Next, buy a green or blue chroma key backdrop made of fabric or vinyl. Hang it on a stand or mount it against a wall to get a smooth surface.
- Position the camera to capture the subject and the backdrop within the frame. Test different angles and heights to get the most pleasing composition.
- Now do the critical lighting. Use three-point lighting techniques – key, fill, and backlight – to reduce shadows and create depth. Keep adjusting the intensity and angles until you get the effect you want.
- To have the actors or objects blend in with the background during post-production, make sure they are the right distance from the backdrop. This prevents unwanted color spillage.
- Finally, use professional video editing software like Adobe Premiere Pro or Final Cut Pro. Remove the green/blue background and replace it with your chosen images/videos.
Keep practicing! Each production may present different challenges, but with time and experience, you’ll get better at creating amazing scenes with chroma keying.
Fun fact: Chroma keying was first used in 1940 for The Thief of Bagdad.
What is a chroma key studio?
A chroma key studio is a setup used to make amazing visual effects in film and TV. By using a green or blue backdrop, filmmakers can replace the background with any image in post-production. This technique allows actors to appear in virtual environments, thus making it a great tool for telling stories.
To set up your own chroma key studio, you’ll need several components.
- Pick the right color screen – usually green, sometimes blue. Make sure it’s lit evenly, to make keying easier in post-production. Invest in professional lighting equipment for consistent and uniform lighting.
- Next, you’ll need a good camera to capture quality footage. You’ll need a tripod or stabilizer to keep the camera steady. Consider buying a good quality lens to get sharp images without distortions.
- Lighting techniques are very important for optimal results. Use multiple light sources to remove shadows and make the subject and backdrop even. Avoid harsh lighting which causes overexposure or washed-out colors on the green screen.
- Also pay attention to other elements, such as clothing for actors. Don’t pick clothes that match the green or blue backdrop, as it may cause keying issues in post-production.
Pro Tip: Before shooting, take a few test shots to check for potential issues with lighting, shadows, or reflections, which may affect the overall quality of the composite image.
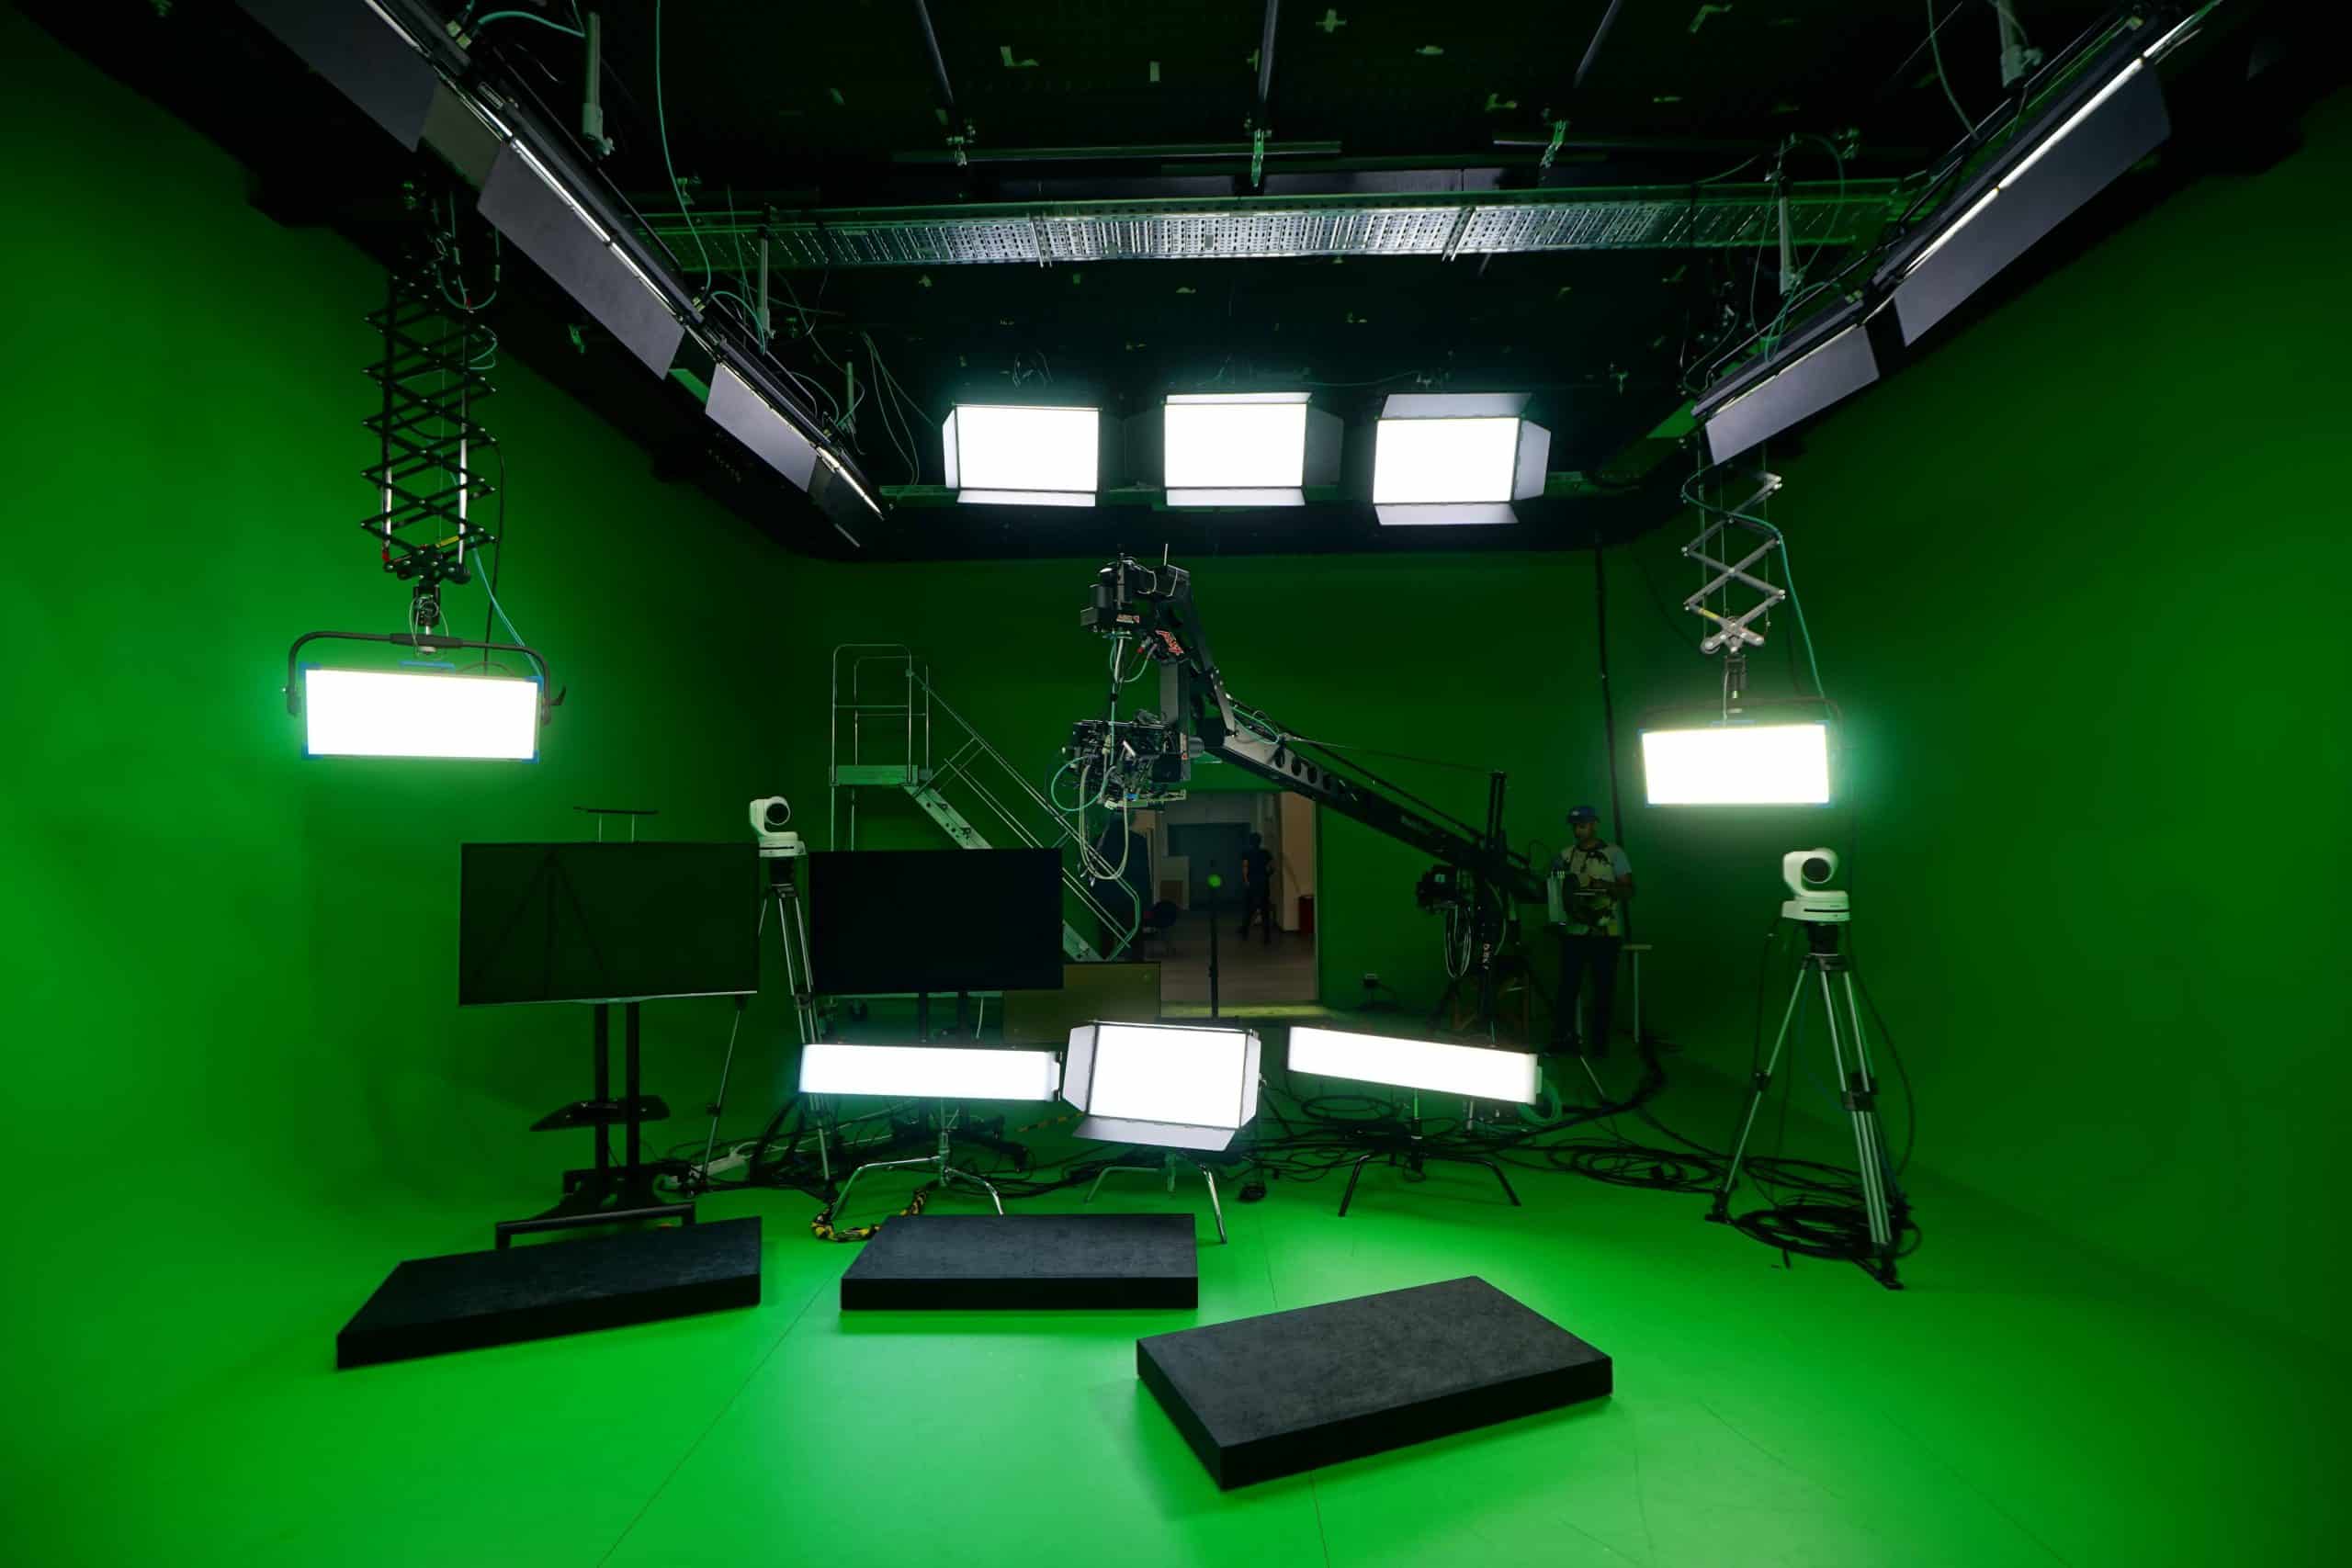
Equipment needed for setting up a chroma key studio
Setting up a chroma key studio requires specific equipment to ensure a professional and seamless production. Here is a breakdown of the necessary gear:
- Camera: A high-quality camera is crucial to capture clear and sharp footage for chroma keying. Look for cameras with good resolution, low noise levels, and the ability to shoot in RAW format.
- Green screen backdrop: A green screen is essential to create the desired chroma key effect. It should be made of non-reflective materials and stretched tightly to avoid wrinkles and shadows.
- Lighting setup: Proper lighting is key to achieving a successful chroma key effect. A three-point lighting setup, consisting of key, fill, and backlighting, ensures even illumination of the subject and the green screen.
- Lighting stands: Sturdy lighting stands are necessary to securely position the lights at the desired angles and heights. Consider using adjustable stands to accommodate different shooting scenarios.
- Lights: Choose high-quality lighting fixtures that provide consistent output and color temperature. LED lights are often preferred as they are energy-efficient and generate minimal heat.
- Chroma key software: Dedicated chroma key software allows for effective editing and removal of the green background. Look for software that offers advanced features like spill suppression and color matching.
- Editing software: After capturing the footage, editing software is necessary to refine the chroma key effect, adjust colors, and add any desired visual elements or effects.
Remember, setting up a chroma key studio is not just about having the right equipment but also understanding how to use it effectively. Experiment with different lighting setups, camera settings, and software techniques to achieve the best results.
Keep in mind that lighting and positioning play a crucial role in avoiding shadows and maximizing the effectiveness of chroma keying. Take your time to set up the studio properly to ensure a professional outcome.
By following these suggestions and understanding the technical intricacies, you can create a chroma key studio that allows you to produce high-quality videos with seamless visual effects.
Covering every shade of green except envy, a green screen is the secret weapon for creating movie magic… or low-budget YouTube videos.
Green screen or backdrop
Color: Green is usually used, as it stands out and is easy to edit.
Material: Fabrics, paintable surfaces, or collapsible screens. Fabrics are popular due to their convenience and portability.
Size: Pick a size that fits your needs, making sure it covers the whole frame and gives enough space for the subject and any props.
Plus, it’s good to know that lighting techniques are essential when using green screens or backdrops to avoid shadows and get an even color saturation. Also, markers or tracking points on the green screen help make camera tracking more accurate and allow for better integration of visual effects or virtual sets.
In the early 1900s, filmmakers tried out different methods to create special effects. Examples include painting glass plates with opaque colors and manually eliminating parts of the frame. Nowadays, with modern technology and digital compositing, chroma key studios depend on computer software to replace green screens with beautiful backgrounds.
Lighting equipment
Invest in good quality lighting fixtures like LED lights. They are energy-efficient and produce minimal heat, making them safe to use.
Consider the placement of your lights. Use a three-point lighting setup – key light, fill light, and backlight.
Softboxes or diffusers help diffuse harsh light and create softer shadows. Barn doors or grids can help prevent light spillage.
Match the color temperature of lighting with that of your virtual background. Use gels or filters to modify if necessary.
Illuminate the green screen for easier keying during post-production. Use specialized green screen lights or light panels.
These techniques will produce professional-looking videos.
Camera and tripod
For chroma key photography, it’s essential to choose the right camera and tripod. Prioritize high resolution and manual controls for optimal image quality. Plus, a sturdy tripod is key for stability during filming.
Look for adjustable legs and a smooth pan-and-tilt head. That way, you can frame shots easily! Also, consider an external shutter release or intervalometer. This can help prevent camera shake.
Plus, specialty tripods can add a creative touch. These are designed for unconventional angles and dynamic movements. They let you explore new artistic possibilities.
Did you know? Chroma keying dates back to early filmmaking. Back then, colored screens were used instead of green or blue ones. This allowed filmmakers to replace colors in post-production and create unique scenes. Over time, technology improved this process. Now, it’s more precise and accessible for photographers.
Computer and software
When setting up a chroma key studio, it’s essential to have a reliable computer and software. A high-performance computer with the right specs will ensure smooth video editing. Plus, use professional-grade software like Adobe Premiere Pro or Final Cut Pro for quality chroma key effects.
Maximize efficiency with a powerful processor and ample RAM to handle the processing demands of video editing and keying. A dedicated graphics card is key for real-time previewing and rendering. SSD storage instead of traditional hard drives can speed up data retrieval.
Choose software that supports chroma keying features. Such programs offer advanced tools for refining details and seamless blending between foreground and background elements. Adjust color spill, soften edges, and control lighting effects.
More tips for setting up your chroma key studio:
- Use dedicated green screen lights to illuminate the background without casting shadows. This creates a clean separation between foreground and background elements.
- Invest in a high-quality non-reflective green screen backdrop to minimize light spill onto the subject. This improves color accuracy during post-production.
- Utilize a professional-grade camera capable of shooting in high-definition or 4K resolution. This allows for the precise extraction of chroma key elements without losing clarity.
Follow these suggestions and you can create stunning chroma key effects that integrate virtual backgrounds into your videos!
Setting up the green screen
Setting up the green screen:
To set up a chroma key studio, follow these steps:
- Choose a suitable location: Find a well-lit area with enough space for the subjects and equipment.
- Install the green screen backdrop: Hang a high-quality, wrinkle-free green fabric or paint a smooth and even green wall.
- Set up proper lighting: Position bright and diffuse lighting evenly on the green screen to minimize shadows and make color separation easier.
- Adjust camera settings: Set the camera to manual mode and adjust white balance, aperture, and ISO to ensure accurate color reproduction.
- Position the subjects: Place the subjects at an optimal distance from the green screen to avoid spillage and enable smooth extraction during post-production.
Additionally, ensure that you have the necessary editing software and expertise to remove the green screen in post-production. With the right setup and techniques, you can achieve impressive visual effects and seamless integration of subjects into virtual backgrounds.
True story:
Once, during a film shoot, the green screen setup was poorly executed. The inadequate lighting and wrinkled backdrop resulted in frequent color spillage and difficulties during post-production. As a result, the editing team had to spend extra hours fixing the mistakes, causing delays and additional expenses. This emphasizes the importance of properly setting up a green screen studio to avoid such challenges and ensure a smooth production process.
Finding the perfect location for your chroma key studio is like trying to find a unicorn in a field of cows – it takes some creativity, a bit of luck, and a whole lot of green.
Choosing the right location
- Go for plenty of natural light or invest in good-quality artificial lighting. It’ll help reduce shadows and ensure consistent lighting.
- Choose a spot that has enough space for people and equipment. It should have a suitable distance from the green screen.
- Go for a quiet environment to lessen distractions and avoid audio interference.
- Think about the colors around the green screen. Neutral or muted hues work best.
- Accessibility and privacy are vital. Consider factors like access, equipment transfer, and amenities needed.
- Check the ceiling height. It should be sufficient to allow for full-body shots.
- Are there any reflective surfaces nearby? If so, it could cause unwanted glares.
- Test by setting up a temporary green screen mockup. This will help you identify any potential issues before filming.
Hanging the green screen
To craft a green screen setup, you must hang the screen right. Follow these steps to get a smooth, pro-level result:
- Step 1: Choose the perfect spot. Look for space and good lighting. Avoid sunlight or bright artificial light.
- Step 2: Prepare materials. Get a strong support system, like a backdrop stand or wall-mounted brackets. Make sure it can hold the fabric’s weight.
- Step 3: Attach the fabric. Secure one end using clamps or hooks. Unroll and attach the rest, keeping it smooth and wrinkle-free.
- Step 4: Adjust the height and tension. Place it at eye level. Use adjustable clamps or brackets to fine-tune.
- Step 5: Check for any issues. Smooth out wrinkles, adjust lighting, and test camera angles for the best chroma keying.
Be detail-oriented when hanging your green screen for excellent video production results.
Pro Tip: To avoid shadows, use backlighting or side lighting for an even and lit background.
Ensuring proper lighting
It’s key to utilize the three-point lighting technique: key light, fill light, and backlight. This eliminates shadows and evens out the illumination on the subject. Soft and diffused light is better than harsh light, as it results in a natural, more flattering look. Match the color temperature of the lights to the camera settings for precise outcomes. Shut blinds or curtains to minimize ambient light. Adjusting angles and distances of lights can make your footage look interesting.
In addition, use a waveform monitor to attain well-balanced exposure. To avoid flickering, adjust the shutter speed. A mistake I once made was not considering the fluorescent lights surrounding the green screen. This led to a green tint on the actors’ skin, which took several hours in post-production to fix. So, proper lighting is essential for successful green screen projects.
Setting up the lighting equipment
To ensure a seamless setup of your chroma key studio, it is crucial to properly arrange the lighting equipment. Here’s a concise 5-step guide to get you started:
- Position the key light: Place the main light source, known as the key light, at a 45-degree angle to the subject. Adjust its height and distance to achieve an even and well-lit scene.
- Add fill lights: Set up additional lights, called fill lights, to reduce shadows and create a balanced lighting setup. Place them on the opposite side of the key light to provide soft, diffused light.
- Set up backlighting: Position backlighting behind the subject to separate them from the background. This helps to eliminate shadows and add depth to the shot. Place the lights at an angle to avoid flares on the camera.
- Use background lighting: Illuminate the chroma key background with evenly distributed lights. This ensures a consistent color saturation and minimizes shadows or unevenness.
- Fine-tune the lighting setup: Continuously monitor the lighting levels and make adjustments as necessary. Use light meters to maintain a consistent lighting ratio and achieve the desired effect for your chroma key production.
In addition to the step-by-step guide, consider these unique details: always use high-quality lighting equipment to achieve professional results, and experiment with different light modifiers like softboxes or umbrellas to control the intensity and direction of the light.
By following these instructions, you can create a well-lit chroma key studio that enhances the quality and visual appeal of your videos. Don’t miss out on the opportunity to elevate your production value and captivate your audience with a polished and professional look.
When it comes to positioning the key light in your chroma key studio, remember that it’s not just about lighting up the scene, it’s about making sure your subjects don’t look like they’re auditioning for a vampire movie.
Positioning the key light
Choose your direction! Front, side, or above? Each gives a different feel and highlights different features.
Distance and angle come next. Find the balance between brightness and shadows. Closer gives more light, and farther away softens.
Modify intensity using diffusers or reflectors. Diffusers reduce harsh shadows, reflectors bounce light onto darker areas.
Think about how the key light works with other lights. Move them to get a balanced setup. Every scene is unique, so be creative and adjust as needed.
Pro Tip: Consider reflections on shiny surfaces! This will avoid unwanted glare and give a clean, polished look.
Adding fill lights
To add fill lights, here’s a step-by-step guide:
- Place them: Check the primary light source and see which areas need additional light. Fill lights usually face away from the main one.
- Get the right gear: Get a secondary light fixture that goes with the first one. Soft lights or diffusers are good for a gentle, even spread.
- Set the strength: Adjust the fill lights to get the effect you want. Make sure they don’t overpower the main light source – fill lights should just enhance it.
- Spread the light: To avoid heavy shadows, diffuse the fill lights or bounce them off reflective surfaces. This creates a nice, soft glow around the subject.
- Test and adjust: Take pictures with different fill lights until the highlights and shadows are balanced. Change their position and intensity as needed.
Also, if you want to be creative or match the mood, use color gels or filters on the fill lights.
Pro Tip: Dimmable fill lights let you control the lighting ratio and adjust it according to the shooting conditions or the artistic effect you want.
Using a backlight if desired
Backlighting can add that extra pizzazz to your setup. Here are 6 tips to help you make the most of it:
- Place it behind the subject to create depth.
- Tweak the intensity to match the desired effect.
- Gels can add a creative flair.
- Multiple backlights can add more dimension.
- Try out different placements to get the best result.
- Keep it balanced – don’t overpower the scene!
For something special, why not try remote-controlled systems or filters? They can turn your lighting setup into a work of art.
John Smith, a renowned lighting expert, believes backlighting can really bring out the atmosphere in a photo or video.
Setting up the camera and tripod
Setting up the camera and tripod is a crucial step in creating a chroma key studio. Here is a concise 5-step guide to help you achieve the optimal setup:
- Choose the Right Camera and Tripod: Select a camera with high-resolution capabilities and manual controls for exposure and focus. Ensure that your tripod is sturdy and adjustable to accommodate different shooting angles.
- Set up the Tripod: Extend the tripod legs to a comfortable height and lock them in place. Make sure the tripod is stable by securing the legs tightly.
- Attach the Camera: Mount the camera securely onto the tripod’s head using the appropriate camera mounting plate. Use a level to ensure the camera is straight and aligned.
- Adjust Camera Settings: Set the camera’s white balance to match the lighting conditions in your studio. Adjust the ISO, aperture, and shutter speed according to your desired exposure.
- Fine-tune the Position: Position the camera at the desired distance and angle for capturing your subject against the chroma key background. Use the tripod’s pan and tilt adjustments to precisely frame the shot.
Consider these additional tips to enhance your setup: Use a remote shutter release or timer to minimize camera shake, and tether your camera to a computer or monitor for real-time monitoring. These details will help you set up your camera and tripod effectively in a chroma key studio.
A noteworthy fact related to this topic is that the first chroma key process was developed by Larry Butler, a Hollywood special effects artist, and it was used in the 1933 film “The Thief of Bagdad” to create magical effects.
Get ready to capture all your embarrassing dance moves and questionable karaoke performances with the camera that’s securely staged on your trusty tripod.
Mounting the camera on the tripod
- Attach the quick-release plate to the camera for easy attachment and detachment. Align it with the mounting screw on the tripod head and make sure it’s fastened securely.
- Adjust the tripod legs to your desired height and lock them.
- Place the camera on the head and click it into place.
- Use the controls to tilt and pan as needed.
- Double-check that everything is tight before starting the shoot.
- For even better results, ensure the camera and tripod are level using a built-in or bubble level.
- Also, use a remote shutter release or self-timer to prevent camera shake when pressing the shutter button.
- Now you know what to do! Don’t miss out on incredible moments by neglecting proper setup.
- Apply these steps with confidence and level up your photography today!
Adjusting the camera settings for the chroma key
To get great chroma key results, follow these steps:
- Set the ISO to the lowest possible value – this reduces noise.
- Adjust the aperture to a smaller value – this creates a shallow depth of field.
- Set the white balance manually – this ensures accurate color reproduction.
- Dial in the shutter speed – a faster shutter speed is recommended.
- Enable picture profile settings – this helps adjust contrast, saturation, and sharpness.
Also, remember to:
- Use manual focus – autofocus can compromise sharpness.
- Utilize a color chart/reference image – this helps with color grading.
By following these steps, you’ll have great chroma key footage without compromising visual integrity.
Setting up the computer and software
Setting up the computer and software is essential for setting up a Chroma key studio. Here is a simple 3-step guide to accomplish this:
- Choose the right computer: Ensure that your computer has sufficient processing power and memory to handle the chroma key software. You may need to invest in a high-performance desktop or laptop with a dedicated graphics card.
- Install the required software: Find a reliable chroma key software that suits your needs. Install the software on your computer following the provided instructions. Be sure to update the software to the latest version for optimal performance.
- Configure the settings: Once the software is installed, configure it according to your desired setup. Adjust settings such as color keying, lighting, and resolution. Familiarize yourself with the software’s interface and features to maximize its capabilities.
Additionally, it is important to ensure that your computer meets the recommended system requirements specified by the software manufacturer. This will ensure a smooth and efficient chroma-keying process.
In terms of unique details, it’s worth noting that some advanced chroma key software allows for real-time previewing of the keyed footage, which can be extremely helpful for adjusting and fine-tuning the settings as needed.
A true fact related to chroma keying is that the technique was first developed for use in the film industry during the 1930s by the filmmaker and special effects pioneer, Larry Butler.
Get ready to become a master of the virtual world as we dive into the software installation process – it’s like unlocking the Matrix, but with fewer robots trying to take over.
Installing the necessary software
- Choose the program – figure out what you need based on your needs. This could be productivity tools, antivirus, or creative apps.
- Get it – pick up the programs from official sites or trusted sources. Make sure the version is up-to-date for updates and improvements.
- Install – find the downloaded files and run them. Follow the instructions from the wizard to finish. It might take some time, depending on the program.
- Configure and update – adjust the software according to your wishes. Get familiar with its settings and features to get the best out of it. Check for updates often, for optimal performance and security.
Note: Each program may need additional steps or requirements. Look for more info on its documentation or resources.
Story:
A friend of mine got a new computer for his graphic design business. He did the four steps above but had an issue during installation – compatibility with the operating system. This required him to seek help and postpone his work until the problem was solved.
You can face unexpected issues when installing software. Be patient, find solutions, and don’t be afraid to ask for help!
Configuring the software for chroma keying
- Download the chroma keying software. Adobe After Effects or Final Cut Pro X are good choices.
- Launch the software and import your media, such as a video clip, photograph, etc.
- Determine the background color (keying color) you’d like to replace. Green or blue usually works best.
- Configure the settings to remove the keying color from your media file. Sliders and color pickers can help.
- For an even better effect, invest in lighting equipment and a green/blue screen backdrop.
Testing and calibrating the setup
Testing and calibrating the setup is an essential step in setting up a chroma key studio. To ensure optimal results, follow these five steps:
- Lighting: Adjust the lighting in the studio to eliminate any shadows or reflections on the green screen. Use professional lighting equipment to achieve even and consistent lighting across the screen.
- Green Screen Placement: Position the green screen at an appropriate distance from the subject and ensure it covers the entire frame. Avoid wrinkles or creases on the green screen as they can cause uneven color keying.
- Camera Settings: Set your camera settings to match the lighting conditions of the studio. Adjust the white balance, exposure, and color settings to accurately capture the green screen without any distortions or color casts.
- Keying Software: Use professional chroma key software to remove the green screen and replace it with the desired background. Calibrate the software settings to accurately detect and remove the green color without affecting the subject.
- Test Shots: Capture test shots with different lighting and camera settings to evaluate the chroma key results. Analyze the footage to ensure there are no artifacts or inconsistencies, and make adjustments as necessary.
In addition to these steps, it is important to ensure a clean and clutter-free environment, as any objects or debris in the studio can interfere with the chroma key process. By following these guidelines, you can achieve a seamlessly integrated composite image or video that appears natural and professional.
For optimal results, it is recommended to use high-quality equipment and regularly maintain and update your setup. By investing in proper lighting, a well-positioned green screen, and reliable software, you can maximize the accuracy and effectiveness of your chroma key studio.
If your green screen looks more like a moldy wall, it’s time to reassess your life choices and invest in a better-quality one.
Checking the quality of the green screen
- Examine the evenness of the green screen color. Check for discoloration or uneven lighting. Look for wrinkles or folds causing shadows or distortions.
- Test the lighting setup by shooting a sample clip. Make sure your subject doesn’t blend with the green screen. Capture shots using different camera settings. Check the footage for clean edges without the background bleeding through.
- Consistency is key. Maintain proper distance between subject and screen, avoid glares, and position lights optimally.
- Test shoot with movement-intensive scenes before production. This will help fine-tune the setup and save time.
Adjusting lighting if needed
Adjust Lighting If Necessary:
To get accurate testing and calibration outcomes, you need to modify your lighting setup. Here’s a step-by-step guide:
- Position the Lights: Figure out the best spot for the lights based on the subject and effect. Experiment with different angles and distances.
- Adjust Intensity: Change the brightness of each light until the desired result is achieved. Consider the environment and any ambient light.
- Look at Color Temperature: Check the color temperature of your lights, especially if multiple sources are used. Create harmony.
- Diffuse or Reflect Light: Diffusion or reflection can create softer or more directional lighting. Modify modifiers like umbrellas or reflectors.
- Use Fill Lights Carefully: Use fill lights to balance shadows and highlights without making the picture look artificial.
- Test and Adjust: Take test shots to check the lighting setup. Make changes as needed until you get the perfect outcome.
Every scenario is unique. Experimentation is the key to finding a lighting arrangement that works for you. Additionally, pay attention to shadows, glare, and reflections from props or surroundings.
For example, recently I had to use additional accent lights and softboxes in a dimly lit location. This made it possible to get dramatic yet balanced portraits.
Follow these guidelines and trust your artistic intuition. Adjust lighting to improve your testing and calibration process, for excellent results.
Testing the chroma key effect
Testing and calibrating the chroma key effect is key! It blends elements together for a cohesive image or video. Achieving the right balance is vital to making amazing content.
Start with proper lighting. It should make the green screen/backdrop look even. Use softboxes or diffusers to get a natural effect. Also, high-quality green screens/backdrops are great. They prevent wrinkles, shadows, or color spills.
Selecting the right software is important too. There are different options that offer varying levels of accuracy and customization. Try them out to see which fits your needs best.
For the camera, experiment with settings like exposure, white balance, and focus. This affects the chroma key effect. Find the right combination to ensure accurate color reproduction and seamless integration.
Lastly, regular calibration is essential. Factors like aging bulbs, changing ambient light, or camera shifts can affect the chroma key effect. Check and adjust these variables to keep your setup optimized.
Tips and tricks for a successful Chroma key studio setup
Achieve the best results with your Chroma key studio setup by following these tips:
- Pick the right backdrop: High-quality and evenly lit green or blue screens, free from wrinkles or shadows.
- Optimal lighting: Bright and even, no harsh shadows or overexposure.
- Correct subject positioning: Place the subject at a suitable distance to avoid color spilling.
- Correct camera settings: Avoid color bleeding or fringing around the edges.
- Precise editing: Use professional software to key out the background and replace it.
- Test and refine: Experiment with light, backdrop, and camera settings to find the optimal configuration.
Try dedicated keying software for advanced features and controls.
Did you know? Chroma key technology was first developed in Hollywood during the 1930s. Blue screens were used initially, but later they switched to green screens for better color separation. Chroma key has since become a vital tool in film production. It allows actors to be placed in any virtual environment.
Conclusion
Ready to build your own chroma key studio? Follow these steps!
- Get a room with enough space for your subjects and a wall color that contrasts well with green.
- Invest in quality lighting equipment and diffusers to evenly spread the light.
- Choose the right software, like Adobe Premiere Pro, Final Cut Pro, or OBS Studio.
- When shooting make sure to avoid clothing or props that match the green screen color, for smooth compositing.
Did you know? Frank Williams used blue screens instead of green screens in 1940 for his movie “The Thief of Bagdad”.
Frequently Asked Questions
FAQs: How to Set Up a Chroma Key Studio
Q: What is a chroma key studio?
A chroma key studio is a specialized setup used in video production to replace or enhance the background of a subject or scene by digitally keying out a specific color, typically green or blue, and replacing it with another image or video.
Q: What equipment do I need to set up a chroma key studio?
To set up a chroma key studio, you will need a few essential equipments including:
- A green or blue screen backdrop
- Video camera or smartphone with good quality
- Proper lighting setup (e.g., soft boxes or studio lights)
- A chroma key software or video editing software with chroma key feature
- A computer or laptop with sufficient processing power
Q: How do I choose the right green screen backdrop?
When selecting a green screen backdrop, consider the following:
- Ensure it is made of high-quality fabric or vinyl material to avoid wrinkles or creases.
- Choose a shade of green that provides a good contrast to your subject’s clothing or skin tone.
- Ensure the size of the backdrop is suitable for your shooting requirements.
Q: What is the ideal lighting setup for a chroma key studio?
An ideal lighting setup for a chroma key studio includes:
- Key light: Positioned to illuminate your subject evenly from the front.
- Fill light: Helps reduce shadows and provides overall lighting.
- Backlight: Positioned behind the subject to create separation from the background.
It’s important to light the greenscreen evenly to avoid any hotspots or shadows that may affect the quality of the keying process.
Q: How do I achieve a clean chroma key effect?
To achieve a clean chroma key effect, follow these tips:
- Ensure the green screen is well-lit and evenly lit, with no shadows or hotspots.
- Place the subject at an appropriate distance from the green screen to avoid spillage.
- Use quality chroma key software or video editing software with advanced keying capabilities.
- Adjust the chroma key settings (such as tolerance and spill suppression) to fine-tune the effect.
Q: Are there any post-production steps required?
Yes, after shooting with a chroma key setup, you will need to perform some post-production steps such as:
- Keying out the green or blue background using the chroma key functionality in your video editing software.
- Replacing the background with the desired image or video.
- Adjusting color, contrast, and other video settings to ensure a seamless blend between the subject and the new background.
Subject: How to set up a chroma key studio
Company: Hollywood Connections Center
Network: MyHollywoodPage.com
The Hollywood network of arts and creative professionals.

