


Tips for drawing from a perspective
Drawing from perspective can be tricky. But, with the right techniques, anyone can do it! Perspective is about creating depth and dimension in art. It gives objects a realistic look and a sense of space. Here are some tips to understand the basics of drawing from perspective.
- Vanishing points! A point on the horizon where all parallel lines meet. Place objects along the lines to create depth and distance. Also, use various-sized objects to show how they appear smaller as they move away. This will give your drawings a 3D feel.
- Foreshortening! This involves portraying objects as viewed from an angle, not straight on. By exaggerating certain dimensions, you can make the drawing more dynamic and realistic. For example, if you draw someone running towards you, their legs may look shorter due to the angle.
- Lighting is essential too. Shading adds volume and form to objects. Notice where the light is falling and how it changes. Dark areas will appear darker, and lighter ones will be brighter. This contrast between light and shadow helps create realism in your drawings.
- Practicing is key! Like any other skill, it takes time and commitment to become good at it. Take inspiration from other artists and study their work.
Understanding Perspective Drawing
To understand perspective drawing effectively, delve into the world of perspective drawing with a focus on its sub-sections: “What is Perspective Drawing?” and “Why is Perspective Drawing Important?” These subsections will provide you with the necessary insights and solutions to enhance your drawing skills in perspective.
What is Perspective Drawing?
Perspective drawing is an amazing art form. It creates a two-dimensional image with depth and realism. Techniques like vanishing points and foreshortening create the illusion of distance and depth. This has been used for centuries to make paintings, sculptures, and architectural designs look more real. It gives viewers a unique perspective – like seeing the world from the artist’s eyes.
What makes perspective drawing special is its ability to show objects as they appear in space. This takes into account size, scale, and position to create a three-dimensional image on a flat surface. It can be learned through practice and knowledge of certain techniques. Lines, angles, and proportions must be understood to display depth correctly.
The roots of perspective drawing go back to the Renaissance. Italian artists Filippo Brunelleschi and Leon Battista Alberti were pioneers. They brought mathematics into their art. Through observation and experimentation, they found the rules of perspective drawing. They gave the starting point for future artists.
Why is Perspective Drawing Important?
Perspective drawing is super important in the art world. It provides dimension and depth to an artist’s work, making it more immersive. Without it, an artwork can seem flat and unrealistic.
Perspective drawing creates a sense of space and distance. It accurately depicts objects in relation to each other and the viewer’s position. This amplifies the composition and makes it more interesting for the eye.
Furthermore, perspective drawing helps with proportions and scale. By knowing how lines converge towards a vanishing point, artists maintain the correct size between objects. This creates a balanced image that catches the viewer’s attention.
In addition, perspective drawing has practical uses. Architects use it to visualize their designs before construction. This helps them show their ideas to clients and engineers, guaranteeing the final outcome is as planned.
For artists to master perspective drawing, they should:
- Study the principles of linear perspective. Concepts like vanishing points, horizon lines, and converging lines are key to accurate representation of space.
- Practice observational drawing. Observing objects and their relationships within a scene or photograph helps train the eyes to perceive depth.
- Experiment with different perspectives. One-point perspective for simple scenes or two-point or even three-point perspective for complex scenes can add dynamicity to an artist’s work.
Overall, perspective drawing gives artists the power to make their creations come alive. With practice and dedication, they can master this essential technique and take their work to new heights.
Types of Perspective Drawing
To achieve a better understanding of different types of perspective drawing, explore one-point perspective, two-point perspective, and three-point perspective. Each sub-section provides a unique solution for creating depth and dimension in your artwork. Embrace the power of perspectives to elevate your drawing skills to new heights.
One-Point Perspective
This technique brings space to life! With a single point on the horizon line as a vanishing point, all parallel lines converge. This creates the illusion of depth and makes the viewer feel like they are looking at a 3D scene.
Objects closer to the viewer appear bigger, while further objects appear smaller. This helps create a sense of distance and scale in the artwork. Artists often use this method for architectural drawings and landscapes.
One-point perspective is unique because it offers a direct viewpoint. It allows for precise measurements and can accurately depict spatial relationships. Famous artists like Filippo Brunelleschi and Leonardo da Vinci have used this technique.
Discover this fascinating technique and bring depth to your drawings. Master one-point perspective and unlock new possibilities in your artwork. Start practicing today!
Two-Point Perspective
The two-Point Perspective is unique. Lines of objects converge toward two points on the horizon line. These points are the viewer’s eye level and create the illusion of distance. By aligning vertical lines to one vanishing point, objects appear to move away.
This technique creates dynamic and dramatic compositions. Lines draw attention to the artwork, creating a sense of depth. To get the best results, it’s important to understand the placement and angle of each point. Experimenting with these points allows artists to manipulate perspective and create different effects and moods.
Unlock your artistic potential with a Two-Point Perspective. Bring drawings to life with depth and realism. Embrace this powerful tool and take your artistry to new heights!
Three-Point Perspective
Using the Three-Point Perspective, artists can create scenes that stretch far into the distance. Three vanishing points give the illusion of depth from various angles. This technique is more complex than the One-Point and Two-Point Perspective. With additional vanishing points comes increased complexity for positioning objects correctly.
This technique challenges artists to think in 3D. An example of this is a renowned artist who painted a mural of a cityscape. This mural was so vivid that viewers felt like they could step right into it. It filled people with joy and wonderment.
Tips for Drawing from a Perspective
To master drawing from a perspective, equip yourself with these essential tips. Start with basic shapes, employ a vanishing point, ensure correct proportions, utilize guidelines and grids, and explore various viewpoints. These practices serve as effective solutions to enhance your perspective drawing skills.
Start with Basic Shapes
Beginning your drawing with basic shapes can give a strong base to capture perspective. This way you can break down challenging subjects into simpler forms, making it simpler to depict depth and size accurately.
Here is a 4-step guide to start with basic shapes:
- Name the main topic of your drawing and visualize its overall shape. Is it round like a sphere or does it have angular features like a cube or pyramid?
- Begin sketching the shape that best represents the subject. For instance, if you are drawing a car, draw a rectangular box for the body and circles for the wheels. Use light lines so you can amend them later.
- Once the basic shape is in place, lightly sketch extra shapes or lines that define the subject’s parts. For example, if you are drawing a face, add ovals for the eyes and a triangle for the nose.
- Refine your drawing by erasing unneeded lines and adjusting the proportions if needed. Notice how each shape relates to others in terms of size and position. Bear in mind these initial shapes are just directions, and you can revise or erase them as you develop your drawing.
In addition to these steps, take note of how light interacts with various forms and surfaces when making realistic perspectives in your drawings.
Pro Tip: Try different shapes and angles to gain more knowledge about how perspective works in your artwork. Don’t be scared of making mistakes – sometimes it leads to surprising discoveries!
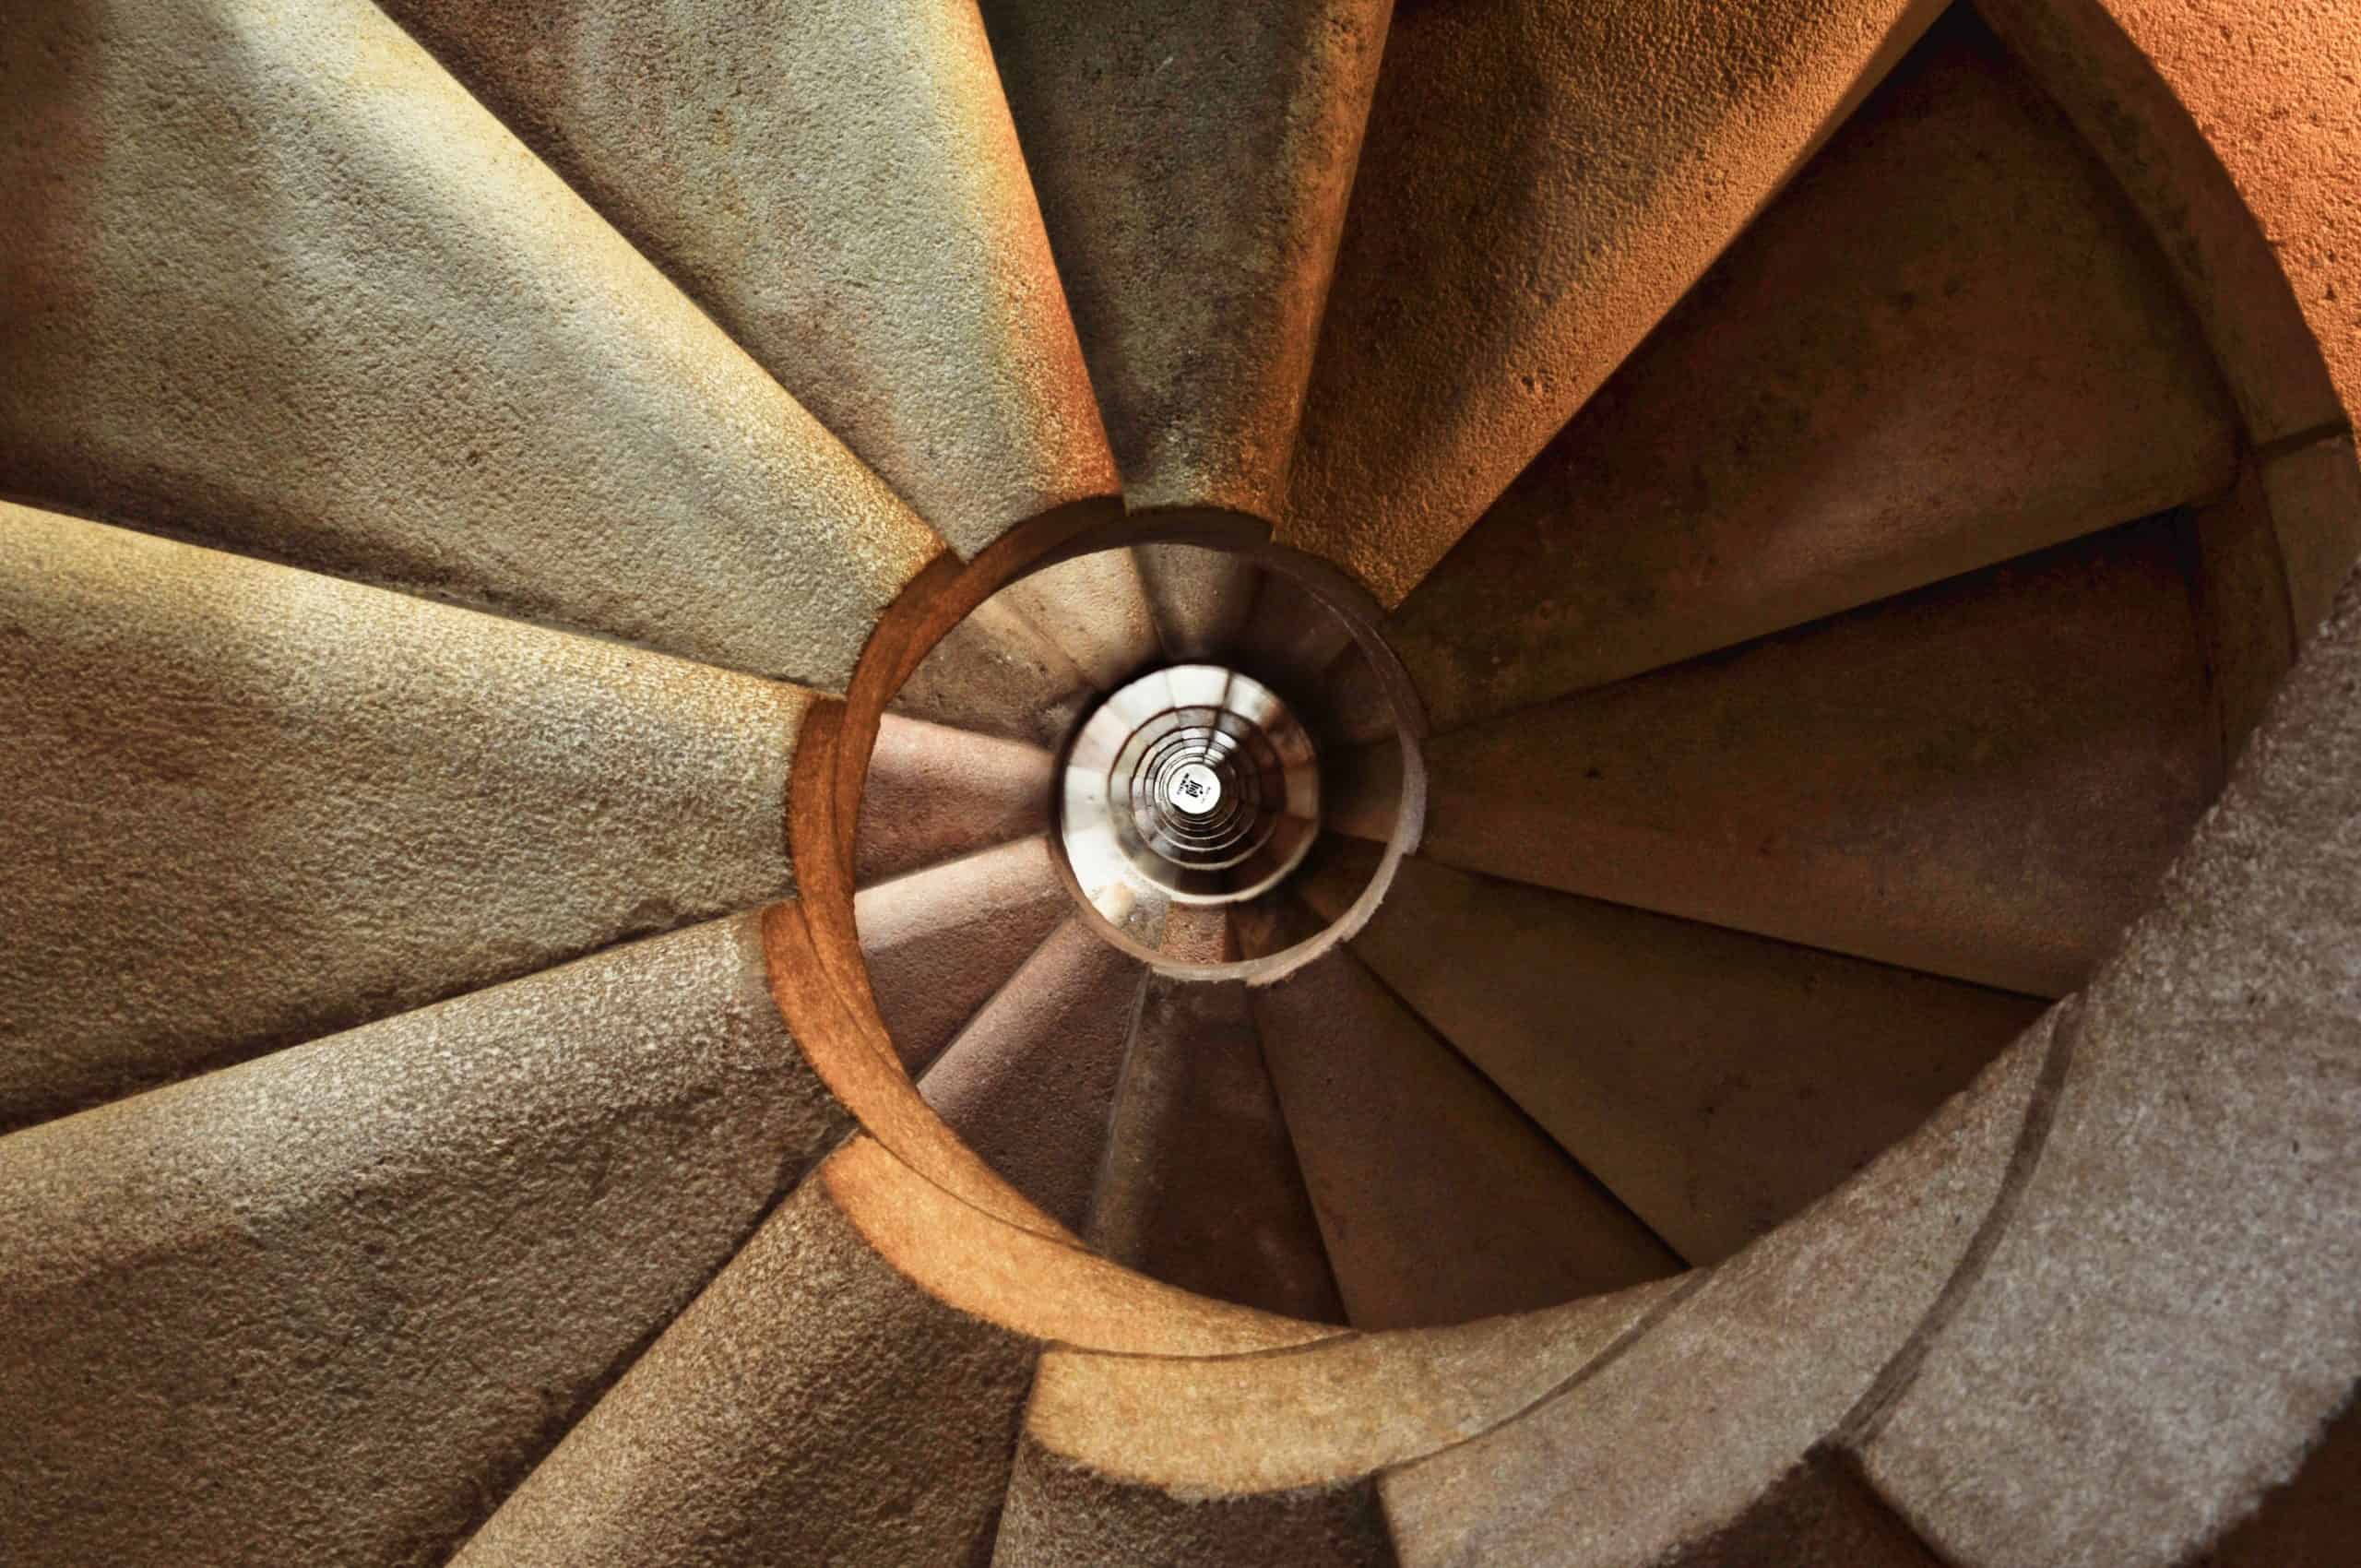
Use a Vanishing Point
Using a Vanishing Point:
As an artist, add a vanishing point to your drawings. This gives the illusion of objects receding into the distance. Place a single point on your paper or canvas to guide the viewer’s eye and create a sense of perspective. This helps you depict how objects look from different angles.
Expanding on the Topic:
To use a vanishing point well, it’s important to understand its role in art. This technique is usually applied to architectural drawings and landscapes, but can also work with other subjects. To get the effect you want, decide where to place the vanishing point, and experiment with different positions and distances.
For complex compositions, try multiple vanishing points. This is common in cityscapes and interior scenes with many walls or hallways. An extra point or two will make the image more dynamic and convincing.
Remember that the size and placement of objects in relation to the vanishing point affect their appearance. Closer objects look larger, while further away objects are smaller. Consider details like foreshortening and overlapping to increase depth in your drawings.
True Fact:
Leonardo da Vinci’s painting “The Last Supper” uses multiple vanishing points for a three-dimensional effect in a two-dimensional artwork (source: Britannica).
Pay Attention to Proportions
Attention to proportions is key for perspective drawings. Be sure the elements are true to size and placement. Proportions bring depth and realism to artwork.
Observe the subject. Notice the sizes of objects and how they fit together.
Measure the lengths or widths of parts, using one object as a reference.
Break complex forms into basic shapes for easier proportion recognition. Circles, squares, and triangles are great guides.
Remember proportions change with perspective and foreshortening. Knowing this helps depict distorted objects.
Use Guidelines and Grids
Artists use guidelines and grids to make accurate perspectives in their drawings. Like a roadmap, these tools help the artist create depth and 3D on a flat surface. Guidelines show vanishing points and horizon lines, helping to accurately place objects. Grids break down complex scenes into smaller, more manageable sections, giving greater precision.
It’s important to keep guidelines and grids light and subtle, so they don’t distract from the finished artwork. They are a foundation, not the focus. Different tools can be used to create them, like rulers or perspective guides.
Guidelines and grids also help with proportions and alignment in a drawing. This detail allows it to appear realistic. Many master artists have used them throughout history. Da Vinci’s Vitruvian Man is a famous example. By using guidelines and grids, he achieved symmetry and proportion!
Experiment with Different Viewpoints
Challenge yourself to draw from different angles! From low angles to bird’s-eye views, explore various perspectives. This opens up unique details and exciting compositions.
Break away from the familiar and discover fresh perspectives that can transform your drawings. Think of high vantage points and close-up worm’s-eye views. With each change in perspective, you can explore new textures, details, and focal points.
Experimenting with different viewpoints allows you to break free from conventional ways of representing objects. Use foreshortening, distortion, and other techniques to create dynamic and eye-catching drawings. Push your artistic boundaries and develop a unique style!
Exploring different viewpoints not only improves your technical skills, it also expands your artistic vision. Train your eyes to perceive the world in a more nuanced way and develop a stronger sense of composition. As you experiment with various perspectives, you’ll become better at creating balanced and visually stunning artwork.
Common Mistakes to Avoid
To avoid common mistakes in drawing from a perspective, equip yourself with these essential tips. From distorted proportions to over-complicating the perspective and neglecting lighting and shadows, this section will guide you through each sub-section, offering effective solutions for improving your drawing skills.
Distorted Proportions
Our view of proportions can be distorted, resulting in mistakes and inaccuracies. This happens when we misjudge the size or scale of things in comparison to others. It can be due to optical illusions, cognitive biases, or lack of spatial understanding.
Distorted proportions can cause false ideas or misinterpretations. This is especially important in art and design to make visually attractive compositions. In architecture and engineering, incorrect proportions lead to structural problems or unattractive looks.
Distorted proportions can be subjective, which means different people can have different opinions. That is why it is important to be aware of these differences and be more tolerant of other’s perspectives.
To show the influence of distorted proportions, I will tell you a story. I saw a painting in an art gallery that looked nice from a distance. When I got closer, I noticed that the artist had purposefully manipulated the proportions to evoke emotions and challenge conventional views. This showed me how powerful distorted proportions can be in creating meaningful artwork.
Overcomplicating the Perspective
Perspectives can be made complex. This happens when individuals focus on details and ignore the big picture. Simplifying the perspective is important. Break down large concepts into smaller parts. This helps with analysis and communication.
Maintain objectivity. Overcomplication is often due to personal biases. Approach the situation with an open mind and consider multiple perspectives. This prevents tunnel vision and helps with a comprehensive analysis.
Seeking feedback from others is smart. Discuss ideas and gain viewpoints. This serves as a reality check and keeps you from getting too complex.
Pro Tip: When faced with a complex situation or problem, take a step back. Simplify by focusing on key elements and get feedback to ensure a well-rounded viewpoint.
Neglecting Lighting and Shadows
Lighting is key to developing a unique atmosphere in a design. Lack of attention to this can lead to dull visuals. Shadows also add depth and realism, and ignoring them will make the designs appear flat.
When considering lighting, think about the direction and intensity of the light source. Try different types, such as ambient light or spotlight, to bring out the desired effect for each element.
Shadows should be in line with the light source, and at a suitable angle. This attention to detail can enhance the overall quality of your work.
Get creative with lighting and shadows! Think outside the box – experiment with unconventional light sources and explore unique shadow formations. These can add an unexpected twist to your design. Remember, creativity can capture the essence of light and shadows!
Practice Exercises for Improving Perspective Drawing Skills
To improve your perspective drawing skills, practice exercises can be highly beneficial. Start by drawing simple objects in perspective, then learn to incorporate perspective in landscapes. Finally, challenge yourself by drawing interior spaces in perspective. Each sub-section offers unique insights and techniques to enhance your perspective drawing abilities.
Drawing Simple Objects in Perspective
Drawing in perspective can be tricky, yet rewarding! To help you improve your skills, here’s a guide:
- Start with a horizon line. Draw a straight one across your paper – it’ll be your reference point for objects.
- Establish two vanishing points. These will give your drawing depth and a 3D appearance.
- Sketch basic shapes. Use cubes, cones, and cylinders – lightly sketch them with guidelines that go to the vanishing points.
- Add details and refine. Make stronger lines for edges, and add shading or textures for a realistic effect.
Practice is key to improving perspective drawing. Try different compositions and perspectives. Mistakes are okay – every drawing is an opportunity to learn and grow.
So grab your sketchbook and practice! The more you immerse yourself, the more confident and skilled you’ll get. Don’t miss out on this chance to develop an amazing ability that’ll set your drawings apart. So start drawing and let your imagination soar!
Incorporating Perspective in Landscapes
Creating captivating landscapes requires understanding perspective techniques. Vanishing points, horizon lines & the rule of thirds add depth & dimension. Atmospheric perspective is key; fading out colors & details helps show distance. Overlap shapes & vary sizes to create a realistic space. Study nature to gain insights & get ideas.
Art history is full of renowned painters who mastered perspective in landscapes – da Vinci & Monet are two examples. Their approaches revolutionized art, inspiring future generations.
Drawing Interior Spaces in Perspective
A skillful drawing of interior spaces in perspective can make it come alive. Here’s how to do it:
- Establish Horizon Line: Draw a horizontal line across the paper. This is the eye level from which the depth is created.
- Create Vanishing Points: Pick two points on the horizon line where converging lines meet. This establishes the direction and angle of lines.
- Draw Converging Lines: Using a ruler, draw lines from objects towards one vanishing point. This creates depth and proportion.
- Include Horizontal Lines: Draw parallel lines to represent flat surfaces (floors, tables, shelves).
- Add Vertical Lines: Draw perpendicular or angled lines to represent walls, doorways, and windows.
- Detail Objects & Furniture: Add details – furniture, decor, lighting fixtures – using curves and straight lines.
Practice is essential to improving perspective drawing skills for interior spaces. Consider lighting and shadows to make it realistic. Perspective drawing has a long history – dating back to ancient Egyptian tomb paintings.
Conclusion
To draw from a perspective, you need to be detail-oriented and understand spatial relationships. Follow tips and techniques to make your artwork more realistic.
- First, determine a vanishing point. This spot is the focus of your drawing and it creates a 3D illusion. Use converging lines that meet at the vanishing point to display objects getting smaller in the distance.
- Use grids or guidelines to keep your artwork balanced and proportionate. Draw these lightly with a pencil. Also, focus on the angle of the subject; and how forms look from different perspectives.
- If needed, use reference images or photos to help. These can show you light, shadows, and textures in different spaces.
By using these tips, you can capture the three-dimensional qualities of a subject. Practice is key, so be patient as you learn. Try different techniques until you find what works best for you.
Frequently Asked Questions
Q: What is perspective drawing?
A: Perspective drawing is a technique used to create the illusion of depth and three-dimensional space in a two-dimensional artwork. It involves representing objects as they appear in reality, considering their size, scale, and position in relation to the viewer.
Q: Why is perspective important in drawing?
A: Perspective is important in drawing because it helps to accurately portray the spatial relationships of objects in a composition. It adds realism and depth to the artwork, making it visually appealing and easier for the viewer to understand.
Q: Are there different types of perspective drawing?
A: Yes, there are various types of perspective drawing techniques. The most common ones are one-point perspective, two-point perspective, and three-point perspective. Each technique involves different vanishing points and angles to create the illusion of depth.
Q: How can I improve my skills in drawing from a perspective?
A: To improve your skills in drawing from a perspective, practice is key. Start by familiarizing yourself with the basic principles of perspective drawing. Study real-life objects and scenes to understand how perspective works in different situations. Experiment with different techniques and gradually challenge yourself with more complex compositions.
Q: What are some tips for achieving a realistic perspective in my drawings?
A: Here are a few tips:
– Use proper horizon and vanishing points.
– Pay attention to size and scale relationships.
– Understand foreshortening and how it affects objects.
– Utilize overlapping, shadows, and highlights.
– Practice drawing converging lines accurately.
– Experiment with different viewpoints and angles.
Q: Are there any tools or aids that can help with perspective drawing?
A: Yes, there are tools and aids that can assist with perspective drawing, such as perspective grids, rulers, and digital software. These tools can help in creating accurate and consistent perspectives in your drawings.
Subject: Tips for drawing from a perspective
Company: Hollywood Connections Center
Network: MyHollywoodPage.com
The Hollywood network of arts and creative professionals.

